
前書き
Zabbixを構築します。
最終的にはサーバの監視とNW機器(Cisco)の監視をしますが、本記事ではインストールまでを備忘録として記事にします。(機器の監視の設定は行いません。別の記事でご紹介します)
ではさっそくやってみましょう。
バージョン
Zabbixを構築する環境は以下のようになっています。
| プロダクト | バージョン |
| OS | CentOS 7 |
| データベース | MySQL 8.0.23 |
| Webサーバ | Apache/2.4.6 |
| PHP | 7.2.24 |
| Zabbix | 5.0 |
事前準備
Zabbixアカウント作成
Linux上に「Zabbix」ユーザと「Zabbix」グループを追加します。Zabbixのプロセスが動くために必要です。
# groupadd --system zabbix
#
# useradd --system -g zabbix -d /usr/lib/zabbix -s /sbin/nologin -c "Zabbix Monitoring System" zabbix
MySQLの構築
ここではデータベースにMySQLを使用します。MySQLをインストールしていきます。
インストールはインターネットに繋がっている状態で、yumで実行することで進めます。(オフラインインストールではないです)
MySQLのレポジトリ登録
CentOS 7にはデフォルトでMySQLのレポジトリは登録されていないので登録します。
# yum localinstall https://dev.mysql.com/get/mysql80-community-release-el7-3.noarch.rpm

~~~(省略)~~~

依存性を解決しました

=====================================================================================================================
 Package                          アーキテクチャー
                                                バージョン      リポジトリー                                    容量
=====================================================================================================================
インストール中:
 mysql80-community-release        noarch        el7-3           /mysql80-community-release-el7-3.noarch         31 k

トランザクションの要約
=====================================================================================================================
インストール  1 パッケージ

~~~(省略)~~~

インストール:
  mysql80-community-release.noarch 0:el7-3

完了しました!

# ll /etc/yum.repos.d/
合計 52
-rw-r--r-- 1 root root 1664 11月 24 00:08 CentOS-Base.repo
-rw-r--r-- 1 root root 1309 11月 24 00:08 CentOS-CR.repo
-rw-r--r-- 1 root root  649 11月 24 00:08 CentOS-Debuginfo.repo
-rw-r--r-- 1 root root  630 11月 24 00:08 CentOS-Media.repo
-rw-r--r-- 1 root root  971 10月 29  2018 CentOS-SCLo-scl-rh.repo
-rw-r--r-- 1 root root 1331 11月 24 00:08 CentOS-Sources.repo
-rw-r--r-- 1 root root 8515 11月 24 00:08 CentOS-Vault.repo
-rw-r--r-- 1 root root  314 11月 24 00:08 CentOS-fasttrack.repo
-rw-r--r-- 1 root root  616 11月 24 00:08 CentOS-x86_64-kernel.repo
-rw-r--r-- 1 root root 2108  4月 25  2019 mysql-community-source.repo ←登録された。
-rw-r--r-- 1 root root 2076  4月 25  2019 mysql-community.repo ←登録された。
MySQLのインストール
yumで依存関係を解決しながらインストールします。
[root@ZABXVM01 ~]# yum install mysql-community-server

~~~(省略)~~~

=====================================================================================================================
 Package                                  アーキテクチャー バージョン              リポジトリー                 容量
=====================================================================================================================
インストール中:
 mysql-community-server                   x86_64           8.0.23-1.el7            mysql80-community           518 M
依存性関連でのインストールをします:
 mysql-community-client                   x86_64           8.0.23-1.el7            mysql80-community            48 M
 mysql-community-client-plugins           x86_64           8.0.23-1.el7            mysql80-community           237 k
 mysql-community-common                   x86_64           8.0.23-1.el7            mysql80-community           621 k
 mysql-community-libs                     x86_64           8.0.23-1.el7            mysql80-community           4.6 M

トランザクションの要約
=====================================================================================================================
インストール  1 パッケージ (+4 個の依存関係のパッケージ)

~~~(省略)~~~

インストール:
  mysql-community-server.x86_64 0:8.0.23-1.el7

依存性関連をインストールしました:
  mysql-community-client.x86_64 0:8.0.23-1.el7          mysql-community-client-plugins.x86_64 0:8.0.23-1.el7
  mysql-community-common.x86_64 0:8.0.23-1.el7          mysql-community-libs.x86_64 0:8.0.23-1.el7

完了しました!
MySQLのスタートと有効化
systemctlコマンドでスタートを有効化を行います。
# systemctl start mysqld
#
# systemctl status mysqld
● mysqld.service - MySQL Server
   Loaded: loaded (/usr/lib/systemd/system/mysqld.service; enabled; vendor preset: disabled)
   Active: active (running) since 日 2021-03-28 18:34:00 JST; 20s ago
     Docs: man:mysqld(8)
           http://dev.mysql.com/doc/refman/en/using-systemd.html
  Process: 8114 ExecStartPre=/usr/bin/mysqld_pre_systemd (code=exited, status=0/SUCCESS)
 Main PID: 8195 (mysqld)
   Status: "Server is operational"
   CGroup: /system.slice/mysqld.service
           mq8195 /usr/sbin/mysqld

 3月 28 18:33:55 ZABXVM01 systemd[1]: Starting MySQL Server...
 3月 28 18:34:00 ZABXVM01 systemd[1]: Started MySQL Server.
#
# systemctl enable mysqld
#
# mysqld --version
/usr/sbin/mysqld  Ver 8.0.23 for Linux on x86_64 (MySQL Community Server - GPL)
MySQLのrootのパスワード変更
「/var/log/mysqld.log」のrootのテンポラリパスワードが記載されているのでメモします。
# cat /var/log/mysqld.log | grep root
2021-03-28T09:33:58.260128Z 6 [Note] [MY-010454] [Server] A temporary password is generated for root@localhost: ************ ←これ。mysqlプロンプトで下記SQL文を発行し、(mysqlの中の)rootのパスワードを変更します。
# mysql -u root -p
Enter password: ←ここにテンポラリパスワードを入力。

mysql> ALTER USER 'root'@'localhost' IDENTIFIED BY '**********'; ←新しいパスワードを指定。
Query OK, 0 rows affected (0.02 sec)
Zabbixのインストール
いよいよZabbixのインストールです。
Zabbixレポジトリのインストール
# rpm -Uvh https://repo.zabbix.com/zabbix/5.0/rhel/7/x86_64/zabbix-release-5.0-1.el7.noarch.rpm
https://repo.zabbix.com/zabbix/5.0/rhel/7/x86_64/zabbix-release-5.0-1.el7.noarch.rpm を取得中
準備しています...              ################################# [100%]
更新中 / インストール中...
   1:zabbix-release-5.0-1.el7         ################################# [100%]
[root@ZABXVM01 atsushi]#
[root@ZABXVM01 atsushi]#
[root@ZABXVM01 atsushi]# ll /etc/yum.repos.d/
合計 56
-rw-r--r-- 1 root root 1664 11月 24 00:08 CentOS-Base.repo
-rw-r--r-- 1 root root 1309 11月 24 00:08 CentOS-CR.repo
-rw-r--r-- 1 root root  649 11月 24 00:08 CentOS-Debuginfo.repo
-rw-r--r-- 1 root root  630 11月 24 00:08 CentOS-Media.repo
-rw-r--r-- 1 root root  971 10月 29  2018 CentOS-SCLo-scl-rh.repo
-rw-r--r-- 1 root root 1331 11月 24 00:08 CentOS-Sources.repo
-rw-r--r-- 1 root root 8515 11月 24 00:08 CentOS-Vault.repo
-rw-r--r-- 1 root root  314 11月 24 00:08 CentOS-fasttrack.repo
-rw-r--r-- 1 root root  616 11月 24 00:08 CentOS-x86_64-kernel.repo
-rw-r--r-- 1 root root 2108  4月 25  2019 mysql-community-source.repo
-rw-r--r-- 1 root root 2076  4月 25  2019 mysql-community.repo
-rw-r--r-- 1 root root  853  5月 11  2020 zabbix.repo ←追加された。
#
# yum clean all
読み込んだプラグイン:fastestmirror, langpacks
リポジトリーを清掃しています: base centos-sclo-rh extras mysql-connectors-community mysql-tools-community
                            : mysql80-community updates zabbix zabbix-non-supported
Cleaning up list of fastest mirrors
Other repos take up 71 M of disk space (use --verbose for details)
ZabbixサーバとZabbixエージェントのインストール
yumでZabbixサーバとZabbixエージェントをインストールします。
# yum install zabbix-server-mysql zabbix-agent

~~~(省略)~~~

=====================================================================================================================
 Package                                アーキテクチャー  バージョン              リポジトリー                  容量
=====================================================================================================================
インストール中:
 zabbix-agent                           x86_64            5.0.10-1.el7            zabbix                       457 k
 zabbix-server-mysql                    x86_64            5.0.10-1.el7            zabbix                       2.9 M
依存性関連でのインストールをします:
 mysql-community-libs-compat            x86_64            8.0.23-1.el7            mysql80-community            1.2 M

トランザクションの要約
=====================================================================================================================
インストール  2 パッケージ (+1 個の依存関係のパッケージ)

~~~(省略)~~~

インストール:
  zabbix-agent.x86_64 0:5.0.10-1.el7                    zabbix-server-mysql.x86_64 0:5.0.10-1.el7

依存性関連をインストールしました:
  mysql-community-libs-compat.x86_64 0:8.0.23-1.el7

完了しました!
Zabbixのフロントエンドをインストール
「Red Hat Software Collections」をインストール(有効化)します。
# yum install centos-release-scl

~~~(省略)~~~

=====================================================================================================================
 Package                           アーキテクチャー      バージョン                      リポジトリー           容量
=====================================================================================================================
インストール中:
 centos-release-scl                noarch                2-3.el7.centos                  extras                 12 k

トランザクションの要約
=====================================================================================================================
インストール  1 パッケージ

~~~(省略)~~~

インストール:
  centos-release-scl.noarch 0:2-3.el7.centos

完了しました!「/etc/yum.repos.d/zabbix.repo」ファイルを編集して、[zabbix-frontend]の中の「enable」を”1“に修正します。
# cp -p /etc/yum.repos.d/zabbix.repo /etc/yum.repos.d/zabbix.repo.org ←バックアップ
#
# vim zabbix.repo
~~~(省略)~~~

[zabbix-frontend]
name=Zabbix Official Repository frontend - $basearch
baseurl=http://repo.zabbix.com/zabbix/5.0/rhel/7/$basearch/frontend
enabled=1 ←ここを「0」から「1」に編集
gpgcheck=1
gpgkey=file:///etc/pki/rpm-gpg/RPM-GPG-KEY-ZABBIX-A14FE591
~~~(省略)~~~
#
# diff /etc/yum.repos.d/zabbix.repo /etc/yum.repos.d/zabbix.repo.org
11c11
< enabled=1
---
> enabled=0Zabbixフロントエンドのパッケージのインストールをします。yumで依存関係も解決しながらインストールするので、適切なPHPも一緒にインストールされます。
# yum install zabbix-web-mysql-scl zabbix-apache-conf-scl

~~~(省略)~~~

=====================================================================================================================
 Package                            アーキテクチャー   バージョン                   リポジトリー                容量
=====================================================================================================================
インストール中:
 zabbix-apache-conf-scl             noarch             5.0.10-1.el7                 zabbix                      15 k
 zabbix-web-mysql-scl               noarch             5.0.10-1.el7                 zabbix                      14 k
依存性関連でのインストールをします:
 libwebp                            x86_64             0.3.0-7.el7                  base                       170 k
 rh-php72                           x86_64             1-2.el7                      centos-sclo-rh             4.3 k
 rh-php72-php-bcmath                x86_64             7.2.24-1.el7                 centos-sclo-rh              60 k
 rh-php72-php-cli                   x86_64             7.2.24-1.el7                 centos-sclo-rh             2.9 M
 rh-php72-php-common                x86_64             7.2.24-1.el7                 centos-sclo-rh             680 k
 rh-php72-php-fpm                   x86_64             7.2.24-1.el7                 centos-sclo-rh             1.5 M
 rh-php72-php-gd                    x86_64             7.2.24-1.el7                 centos-sclo-rh             151 k
 rh-php72-php-json                  x86_64             7.2.24-1.el7                 centos-sclo-rh              54 k
 rh-php72-php-ldap                  x86_64             7.2.24-1.el7                 centos-sclo-rh              59 k
 rh-php72-php-mbstring              x86_64             7.2.24-1.el7                 centos-sclo-rh             553 k
 rh-php72-php-mysqlnd               x86_64             7.2.24-1.el7                 centos-sclo-rh             166 k
 rh-php72-php-pdo                   x86_64             7.2.24-1.el7                 centos-sclo-rh             101 k
 rh-php72-php-pear                  noarch             1:1.10.5-1.el7               centos-sclo-rh             357 k
 rh-php72-php-process               x86_64             7.2.24-1.el7                 centos-sclo-rh              62 k
 rh-php72-php-xml                   x86_64             7.2.24-1.el7                 centos-sclo-rh             160 k
 rh-php72-php-zip                   x86_64             7.2.24-1.el7                 centos-sclo-rh              90 k
 rh-php72-runtime                   x86_64             1-2.el7                      centos-sclo-rh             1.1 M
 zabbix-web                         noarch             5.0.10-1.el7                 zabbix                     3.2 M
 zabbix-web-deps-scl                noarch             5.0.10-1.el7                 zabbix                      15 k

トランザクションの要約
=====================================================================================================================
インストール  2 パッケージ (+19 個の依存関係のパッケージ)

~~~(省略)~~~

完了しました!
Zabbixデータベースの作成
データベース作成とイニシャルスキーマのインポート
MySQLに、Zabbixのデータベースを作成します。
# mysql -u root -p
Enter password: ←MySQLのrootのパスワードを入力。

mysql> create database zabbix character set utf8 collate utf8_bin; ←「Zabbix」という名前のデータベースを作成。
Query OK, 1 row affected, 2 warnings (0.01 sec)

mysql> create user zabbix@localhost identified by '*********'; ←MySQLの中のZabbixユーザのパスワードを決定する。
Query OK, 0 rows affected (0.01 sec)

mysql> grant all privileges on zabbix.* to zabbix@localhost; ←MySQLの中のZabbixユーザにZabbixデータベースへの権限を与える。
Query OK, 0 rows affected (0.00 sec)

mysql> exit;

# zcat /usr/share/doc/zabbix-server-mysql*/create.sql.gz | mysql -uzabbix -p zabbix
Enter password: ←先ほど決めたMySQLの中のZabbixユーザのパスワードを入力。
zabbix_server.confの編集
/etc/zabbix/zabbix_server.confに、Zabbixデータベースのパスワードを記載します。
#cp -p /etc/zabbix/zabbix_server.conf /etc/zabbix/zabbix_server.conf.org ←バックアップ。
#
# vim /etc/zabbix/zabbix_server.conf

~~~(省略)~~~
### Option: DBPassword
#       Database password.
#       Comment this line if no password is used.
#
# Mandatory: no
# Default:
DBPassword=********** ←コメントアウトを外して、Zabbixユーザのパスワードを記載。
~~~(省略)~~~

#
# diff /etc/zabbix/zabbix_server.conf /etc/zabbix/zabbix_server.conf.org
124c124
< DBPassword==**********
---
> # DBPassword=
180,188d179
/etc/opt/rh/rh-php72/php-fpm.d/zabbix.confの編集
/etc/opt/rh/rh-php72/php-fpm.d/zabbix.confに、監視するサーバが存在する場所のタイムゾーンを記載します。
# cp -p /etc/opt/rh/rh-php72/php-fpm.d/zabbix.conf /etc/opt/rh/rh-php72/php-fpm.d/zabbix.conf.org
#
# vim /etc/opt/rh/rh-php72/php-fpm.d/zabbix.conf

~~~(省略)~~~
php_value[date.timezone] = Asia/Tokyo ←コメントアウトを外して自分のタイムゾーンにする。
~~~(省略)~~~

#
# diff /etc/opt/rh/rh-php72/php-fpm.d/zabbix.conf /etc/opt/rh/rh-php72/php-fpm.d/zabbix.conf.org
24c24
< php_value[date.timezone] = Asia/Tokyo
---
> ; php_value[date.timezone] = Europe/Riga
サービスの起動と有効化
Zabbixサーバ、Zabbixエージェント、Apache、PHPのサービスの起動と有効化です。
# systemctl restart zabbix-server zabbix-agent httpd rh-php72-php-fpm
#
# systemctl enable zabbix-server zabbix-agent httpd rh-php72-php-fpm
Created symlink from /etc/systemd/system/multi-user.target.wants/zabbix-server.service to /usr/lib/systemd/system/zabbix-server.service.
Created symlink from /etc/systemd/system/multi-user.target.wants/zabbix-agent.service to /usr/lib/systemd/system/zabbix-agent.service.
Created symlink from /etc/systemd/system/multi-user.target.wants/rh-php72-php-fpm.service to /usr/lib/systemd/system/rh-php72-php-fpm.service.
#
# systemctl status zabbix-server
● zabbix-server.service - Zabbix Server
   Loaded: loaded (/usr/lib/systemd/system/zabbix-server.service; enabled; vendor preset: disabled)
   Active: active (running) since 火 2021-03-30 19:46:55 JST; 33s ago
 Main PID: 6815 (zabbix_server)

~~~(省略)~~~

 3月 30 19:46:55 ZABXVM01 systemd[1]: Starting Zabbix Server...
 3月 30 19:46:55 ZABXVM01 systemd[1]: Can't open PID file /run/zabbix/zabbix_server.pid (yet?) after start: ...ctory
 3月 30 19:46:55 ZABXVM01 systemd[1]: Started Zabbix Server.
Hint: Some lines were ellipsized, use -l to show in full.
#
# systemctl status zabbix-agent
● zabbix-agent.service - Zabbix Agent
   Loaded: loaded (/usr/lib/systemd/system/zabbix-agent.service; enabled; vendor preset: disabled)
   Active: active (running) since 火 2021-03-30 19:46:55 JST; 49s ago
 Main PID: 6808 (zabbix_agentd)

~~~(省略)~~~

 3月 30 19:46:55 ZABXVM01 systemd[1]: Starting Zabbix Agent...
 3月 30 19:46:55 ZABXVM01 systemd[1]: Can't open PID file /run/zabbix/zabbix_agentd.pid (yet?) after start: ...ctory
 3月 30 19:46:55 ZABXVM01 systemd[1]: Started Zabbix Agent.
Hint: Some lines were ellipsized, use -l to show in full.
#
# systemctl status httpd
● httpd.service - The Apache HTTP Server
   Loaded: loaded (/usr/lib/systemd/system/httpd.service; enabled; vendor preset: disabled)
   Active: active (running) since 火 2021-03-30 19:46:57 JST; 53s ago
     Docs: man:httpd(8)
           man:apachectl(8)
 Main PID: 6890 (httpd)

~~~(省略)~~~

 3月 30 19:46:56 ZABXVM01 systemd[1]: Starting The Apache HTTP Server...
 3月 30 19:46:56 ZABXVM01 httpd[6890]: AH00558: httpd: Could not reliably determine the server's fully quali...ssage
 3月 30 19:46:57 ZABXVM01 systemd[1]: Started The Apache HTTP Server.
Hint: Some lines were ellipsized, use -l to show in full.
#
# systemctl status rh-php72-php-fpm
● rh-php72-php-fpm.service - The PHP FastCGI Process Manager
   Loaded: loaded (/usr/lib/systemd/system/rh-php72-php-fpm.service; enabled; vendor preset: disabled)
   Active: active (running) since 火 2021-03-30 19:46:55 JST; 1min 5s ago
 Main PID: 6805 (php-fpm)

~~~(省略)~~~

 3月 30 19:46:55 ZABXVM01 systemd[1]: Starting The PHP FastCGI Process Manager...
 3月 30 19:46:55 ZABXVM01 systemd[1]: Started The PHP FastCGI Process Manager.
下記エラーでzabbix_serverが起動できないとき
もしZabbixサーバのサービスが下記エラーで起動できないときは、後述するSQLでご対応ください。(詳細はMySQLの公式サイトを参照願います)
# systemctl status zabbix-server.service
● zabbix-server.service - Zabbix Server
   Loaded: loaded (/usr/lib/systemd/system/zabbix-server.service; enabled; vendor preset: disabled)
   Active: activating (auto-restart) (Result: exit-code) since 火 2021-03-30 22:52:21 JST; 6s ago
  Process: 16574 ExecStop=/bin/kill -SIGTERM $MAINPID (code=exited, status=0/SUCCESS)
  Process: 20935 ExecStart=/usr/sbin/zabbix_server -c $CONFFILE (code=exited, status=0/SUCCESS)
 Main PID: 20937 (code=exited, status=1/FAILURE)

 3月 30 22:52:21 ZABXVM01 systemd[1]: zabbix-server.service: main process exited, code=exited, status=1/FAILURE
 3月 30 22:52:21 ZABXVM01 systemd[1]: Unit zabbix-server.service entered failed state.
 3月 30 22:52:21 ZABXVM01 systemd[1]: zabbix-server.service failed.
#
# tail -f /var/log/zabbix/zabbix_server.log

~~~(省略)~~~

 20925:20210330:225211.633 Starting Zabbix Server. Zabbix 5.0.10 (revision 7c3f43904c).
 20925:20210330:225211.633 ****** Enabled features ******
 20925:20210330:225211.633 SNMP monitoring:           YES
 20925:20210330:225211.633 IPMI monitoring:           YES
 20925:20210330:225211.633 Web monitoring:            YES
 20925:20210330:225211.633 VMware monitoring:         YES
 20925:20210330:225211.633 SMTP authentication:       YES
 20925:20210330:225211.633 ODBC:                      YES
 20925:20210330:225211.633 SSH support:               YES
 20925:20210330:225211.633 IPv6 support:              YES
 20925:20210330:225211.633 TLS support:               YES
 20925:20210330:225211.633 ******************************
 20925:20210330:225211.633 using configuration file: /etc/zabbix/zabbix_server.conf
 20925:20210330:225211.634 [Z3001] connection to database 'zabbix' failed: [2059] Authentication plugin 'caching_sha2_password' cannot be loaded: /usr/lib64/mysql/plugin/caching_sha2_password.so: cannot open shared object file: No such file or directory
 20925:20210330:225211.634 Cannot connect to the database. Exiting...
下記コマンドを実行します。
# systemctl stop zabbix-server.service
#
# mysql -u root -p
Enter password:

mysql> ALTER USER zabbix@localhost IDENTIFIED WITH mysql_native_password BY 'Tobias-0627';
Query OK, 0 rows affected (0.00 sec)

mysql> quit
Bye

# systemctl start zabbix-server.service
#
# systemctl status zabbix-server.service
● zabbix-server.service - Zabbix Server
   Loaded: loaded (/usr/lib/systemd/system/zabbix-server.service; enabled; vendor preset: disabled)
   Active: active (running) since 火 2021-03-30 22:56:23 JST; 6s ago
  Process: 16574 ExecStop=/bin/kill -SIGTERM $MAINPID (code=exited, status=0/SUCCESS)
  Process: 21275 ExecStart=/usr/sbin/zabbix_server -c $CONFFILE (code=exited, status=0/SUCCESS)
 Main PID: 21277 (zabbix_server)

~~~(省略)~~~

 3月 30 22:56:23 ZABXVM01 systemd[1]: Starting Zabbix Server...
 3月 30 22:56:23 ZABXVM01 systemd[1]: Can't open PID file /run/zabbix/zabbix_server.pid (yet?) after start: No such file or directory
3月 30 22:56:23 ZABXVM01 systemd[1]: Started Zabbix Server.詳しくは「6.3.8.1 ネイティブ認証プラグイン」をご覧ください。
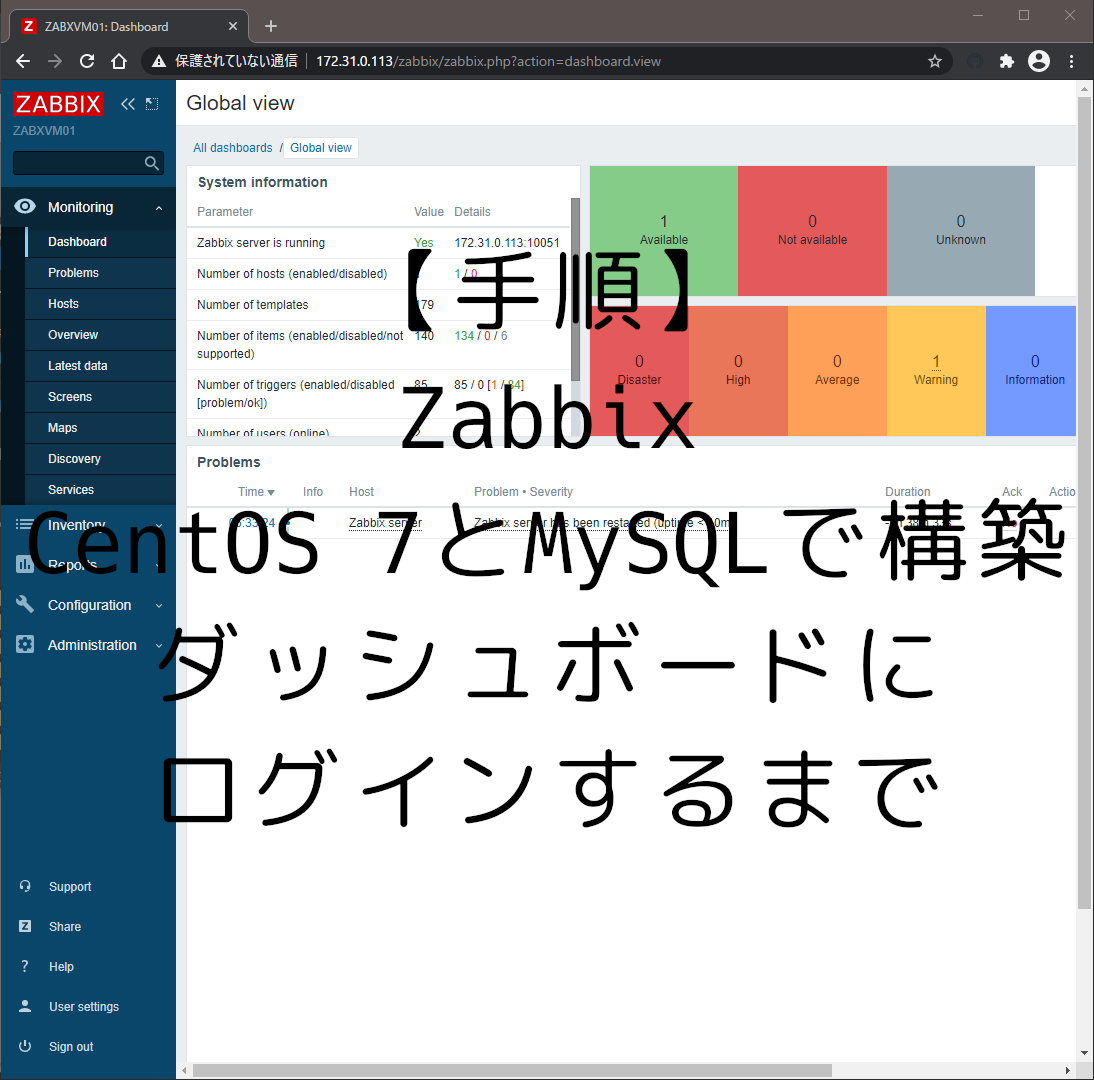
Zabbixフロントエンドへアクセス
「http://[サーバのIPアドレス]/zabbix/」がZabbixフロントエンドのアドレスになります。
Web画面が表示されないとき
もしWeb画面が表示されない場合は、以下のことをご確認ください。
- Zabbix関連のサービスは起動しているか
- Webサーバ(ここではApache)は起動しているか
- データベース(ここではMySQL)は起動しているか
- Linuxのファイアーウォール(firewalldやiptables)が起動していて、ブロックされていないか
Zabbixインストールの最終セットアップ
- 「Next step」ボタンをクリックします。

- Zabbixに必要なコンポ―ネントの事前チェックが行われます。すべて「OK」と表示されていれば、「Next step」をクリックします。
- Zabbixデータベースの情報を入力します。注意すべきなのはZabbixユーザのパスワードを入力するところです。
- [Host]にはZabbixサーバのIPアドレスかホスト名を入力します。[Port]はここではデフォルトの「10051」とします。[Name]は任意です。
- インストールサマリ(最終チェック)が表示されるので、確認して「Next step」をクリックします。
- インストールが成功した旨のメッセージが表示されれば成功です。「Finish」をクリックします。
- ログイン画面が表示されるので、[Username]に「Admin」、[Password]に「Zabbix」と入力して、「Sign in」ボタンをクリックします。(初期状態の固定値です)
- ダッシュボード画面が表示されると思います。ここまで来たらインストールは完了と言えるでしょう。


機器監視の設定追加は、別の記事で取り扱っていきます。
参考サイト
CentOS7にMySQLをインストールして初期設定するまで
CentOS 7にPHP 7.3をインストールしてApache HTTP Serverと連携させる方法


コメント