
もくじ
- はじめに
- 手順
- Nagios Coreのパッケージをダウンロード
- Ubuntu 16をインストールとSELinuxパッケージの存在なしを確認
- インストールに必要なパッケージをインストールする
- Nagios-Coreのソースのダウンロード
- Nagios-Coreのソースのコンパイル
- Nagiosユーザーとグループの作成
- バイナリファイルのインストール
- サービスとデーモンのインストール
- コマンドモードのインストール
- 設定ファイルのインストール
- Apacheの設定ファイルをインストール
- ファイアーウォールの設定
- NagiosのAdminユーザーアカウントの作成
- Apache Webサーバの開始
- サービスとデーモンの開始
- Nagios Webインターフェースにログイン
- Nagiosログのエラーの解消(Nagiosプラグインのインストール)
- 終わりに
はじめに
Ubuntu 16でNagios Coreの構築手順を記載します。
本記事では、Nagios CoreのWEBインターフェースにログインするまでをゴールとします。
参考としたサイトはNagios Coreの公式ドキュメントです。
https://support.nagios.com/kb/article/nagios-core-installing-nagios-core-from-source-96.html#Ubuntu
環境は以下のようになっています。
| ソフトウェア | バージョン |
| Nagios Core | 4.4.5 |
| Ubuntu | 16.04 LTS |
| Apache | 2.4.18 |
手順
Nagios Coreのパッケージをダウンロード
- 下記URLにアクセスします。
https://www.nagios.org/downloads/nagios-core/
- 「Nagios Core」の下の[Download]ボタンをクリックします。

- この画面は[Skip]ボタンで問題ありません。
- 今の最新バージョンの[nagios-4.4.5.tar.gz]をクリックしてパッケージをダウンロードします。


Ubuntu 16をインストールとSELinuxパッケージの存在なしを確認
ここではUbuntuのインストール手順は省きます。Ubuntuをインストールした後、SELinuxパッケージが設定されていないことを確認します。
atsushi@NAGIVM01:~$ sudo dpkg -l selinux*
[sudo] atsushi のパスワード:
要望=(U)不明/(I)インストール/(R)削除/(P)完全削除/(H)保持
| 状態=(N)無/(I)インストール済/(C)設定/(U)展開/(F)設定失敗/(H)半インストール/(W)トリガ待ち/(T)トリガ保留
|/ エラー?=(空欄)無/(R)要再インストール (状態,エラーの大文字=異常)
||/ 名前                            バージョン           アーキテクチャ       説明
+++-===============================-====================-====================-====================================================================
un  selinux-policy-default          <なし>               <なし>               (説明 (description) がありません)
atsushi@NAGIVM01:~$インストールに必要なパッケージをインストールする
Ubuntu 16または17で、Nagios Coreのインストール前に必要なパッケージは以下です。
| 必要なパッケージ |
| autoconf |
| gcc |
| libc6 |
| make |
| wget |
| unzip |
| apache2 |
| php |
| libapache2-mod-php7.2 |
| libgd-dev |
下記コマンドでインストールします。
$ sudo apt-get upgrade
$ sudo apt-get install -y autoconf gcc libc6 make wget unzip apache2 php libapache2-mod-php7.0 libgd2-xpm-dev
※「apt-get upgrade」コマンドで、インストールされているパッケージを最新にしています。
※「apt-get install -y」コマンドで、指定したパッケージに対してすべて”yes”と答えてインストールしています。
Nagios-Coreのソースのダウンロード
$ cd /tmp
$ wget -O nagioscore.tar.gz https://github.com/NagiosEnterprises/nagioscore/archive/nagios-4.4.5.tar.gz
$ tar xzf nagioscore.tar.gz
※「wget -O」コマンドで、指定したURLからソースをダウンロードし、”nagioscore.tar.gz”という名前のファイルに出力しています。
※「tar xzf」コマンドで、”nagioscore.tar.gz”ファイルを解凍しています。
Nagios-Coreのソースのコンパイル
$ cd /tmp/nagioscore-nagios-4.4.5/
$ sudo ./configure --with-httpd-conf=/etc/apache2/sites-enabled
[sudo] atsushi のパスワード:
checking for a BSD-compatible install... /usr/bin/install -c
checking build system type... x86_64-pc-linux-gnu
checking host system type... x86_64-pc-linux-gnu
checking for gcc... gcc

~~~~~(省略)~~~~~

config.status: creating lib/iobroker.h

Creating sample config files in sample-config/ ...


*** Configuration summary for nagios 4.4.5 2019-08-20 ***:

 General Options:
 -------------------------
        Nagios executable:  nagios
        Nagios user/group:  nagios,nagios
       Command user/group:  nagios,nagios
             Event Broker:  yes
        Install ${prefix}:  /usr/local/nagios
    Install ${includedir}:  /usr/local/nagios/include/nagios
                Lock file:  /run/nagios.lock
   Check result directory:  /usr/local/nagios/var/spool/checkresults
           Init directory:  /lib/systemd/system
  Apache conf.d directory:  /etc/apache2/sites-enabled
             Mail program:  /bin/mail
                  Host OS:  linux-gnu
          IOBroker Method:  epoll

 Web Interface Options:
 ------------------------
                 HTML URL:  http://localhost/nagios/
                  CGI URL:  http://localhost/nagios/cgi-bin/
 Traceroute (used by WAP):


Review the options above for accuracy.  If they look okay,
type 'make all' to compile the main program and CGIs.

atsushi@NAGIVM01:/tmp/nagioscore-nagios-4.4.5$ sudo make all
cd ./base && make
make[1]: ディレクトリ '/tmp/nagioscore-nagios-4.4.5/base' に入ります
gcc -Wall -I.. -g -O2 -DHAVE_CONFIG_H -DNSCORE -c -o nagios.o nagios.c
nagios.c: In function ‘main’:
nagios.c:611:4: warning: ignoring return value of ‘asprintf’, declared with attribute warn_unused_result [-Wunused-result]
    asprintf(&mac->x[MACRO_PROCESSSTARTTIME], "%llu", (unsigned long long)program_start);

~~~~~(省略)~~~~~

*** Support Notes *******************************************

If you have questions about configuring or running Nagios,
please make sure that you:

     - Look at the sample config files
     - Read the documentation on the Nagios Library at:

       "https://library.nagios.com"

before you post a question to one of the mailing lists.
Also make sure to include pertinent information that could
help others help you.  This might include:

     - What version of Nagios you are using
     - What version of the plugins you are using
     - Relevant snippets from your config files
     - Relevant error messages from the Nagios log file

For more information on obtaining support for Nagios, visit:

       "https://support.nagios.com"

*************************************************************

Enjoy.

atsushi@NAGIVM01:/tmp/nagioscore-nagios-4.4.5$
※「./configure」コマンドに「–with-httpd-conf」オプションを付けて、「/etc/apache2/sites-enabled」ディレクトリの設定ファイルを指定して、MakeFileを作成しています。
※「make all」コマンドで、コンパイルしています。
Nagiosユーザーとグループの作成
atsushi@NAGIVM01:/tmp/nagioscore-nagios-4.4.5$ sudo make install-groups-users
[sudo] atsushi のパスワード:
groupadd -r nagios
useradd -g nagios nagios
atsushi@NAGIVM01:/tmp/nagioscore-nagios-4.4.5$
※「make install-groups-users」コマンドを実行することによって、「groupadd -r nagios」コマンドと「useradd -g nagios nagios」コマンドが実行されます。つまり、”nagios”というシステムグループが作成され、その”nagios”グループに”nagios”ユーザがシステムユーザーとして作成され、追加されます。
$ sudo usermod -a -G nagios www-data※”www-data”グループのサブグループに、”nagios”グループを追加しています。
バイナリファイルのインストール
$ sudo make install※この手順で、バイナリファイルと、CGIと、HTMLファイルがインストールされます。
サービスとデーモンのインストール
atsushi@NAGIVM01:/tmp/nagioscore-nagios-4.4.5$ sudo make install-daemoninit
/usr/bin/install -c -m 755 -d -o root -g root /lib/systemd/system
/usr/bin/install -c -m 755 -o root -g root startup/default-service /lib/systemd/system/nagios.service
Created symlink from /etc/systemd/system/multi-user.target.wants/nagios.service to /lib/systemd/system/nagios.service.

*** Init script installed ***

atsushi@NAGIVM01:/tmp/nagioscore-nagios-4.4.5$
※サービスとデーモンのファイルをインストールし、起動時にスタートするように設定しています。
コマンドモードのインストール
atsushi@NAGIVM01:/tmp/nagioscore-nagios-4.4.5$ sudo make install-commandmode
/usr/bin/install -c -m 775 -o nagios -g nagios -d /usr/local/nagios/var/rw
chmod g+s /usr/local/nagios/var/rw

*** External command directory configured ***

atsushi@NAGIVM01:/tmp/nagioscore-nagios-4.4.5$
※エクスターナルコマンドのファイルと設定をインストールしています。
設定ファイルのインストール
サンプルの設定ファイルをインストールします。
atsushi@NAGIVM01:/tmp/nagioscore-nagios-4.4.5$ sudo make install-config
/usr/bin/install -c -m 775 -o nagios -g nagios -d /usr/local/nagios/etc
/usr/bin/install -c -m 775 -o nagios -g nagios -d /usr/local/nagios/etc/objects
/usr/bin/install -c -b -m 664 -o nagios -g nagios sample-config/nagios.cfg /usr/local/nagios/etc/nagios.cfg
/usr/bin/install -c -b -m 664 -o nagios -g nagios sample-config/cgi.cfg /usr/local/nagios/etc/cgi.cfg
/usr/bin/install -c -b -m 660 -o nagios -g nagios sample-config/resource.cfg /usr/local/nagios/etc/resource.cfg
/usr/bin/install -c -b -m 664 -o nagios -g nagios sample-config/template-object/templates.cfg /usr/local/nagios/etc/objects/templates.cfg
/usr/bin/install -c -b -m 664 -o nagios -g nagios sample-config/template-object/commands.cfg /usr/local/nagios/etc/objects/commands.cfg
/usr/bin/install -c -b -m 664 -o nagios -g nagios sample-config/template-object/contacts.cfg /usr/local/nagios/etc/objects/contacts.cfg
/usr/bin/install -c -b -m 664 -o nagios -g nagios sample-config/template-object/timeperiods.cfg /usr/local/nagios/etc/objects/timeperiods.cfg
/usr/bin/install -c -b -m 664 -o nagios -g nagios sample-config/template-object/localhost.cfg /usr/local/nagios/etc/objects/localhost.cfg
/usr/bin/install -c -b -m 664 -o nagios -g nagios sample-config/template-object/windows.cfg /usr/local/nagios/etc/objects/windows.cfg
/usr/bin/install -c -b -m 664 -o nagios -g nagios sample-config/template-object/printer.cfg /usr/local/nagios/etc/objects/printer.cfg
/usr/bin/install -c -b -m 664 -o nagios -g nagios sample-config/template-object/switch.cfg /usr/local/nagios/etc/objects/switch.cfg

*** Config files installed ***

Remember, these are *SAMPLE* config files. You'll need to read
the documentation for more information on how to actually define
services, hosts, etc. to fit your particular needs.

atsushi@NAGIVM01:/tmp/nagioscore-nagios-4.4.5$
Apacheの設定ファイルをインストール
Apache Webサーバの設定ファイルをインストールし、Apacheの設定を行います。
atsushi@NAGIVM01:/tmp/nagioscore-nagios-4.4.5$ sudo make install-webconf
/usr/bin/install -c -m 644 sample-config/httpd.conf /etc/apache2/sites-enabled/nagios.conf
if [ 0 -eq 1 ]; then \
ln -s /etc/apache2/sites-enabled/nagios.conf /etc/apache2/sites-enabled/nagios.conf; \
fi

*** Nagios/Apache conf file installed ***

atsushi@NAGIVM01:/tmp/nagioscore-nagios-4.4.5$
atsushi@NAGIVM01:/tmp/nagioscore-nagios-4.4.5$ sudo a2enmod rewrite
Enabling module rewrite.
To activate the new configuration, you need to run:
  service apache2 restart
atsushi@NAGIVM01:/tmp/nagioscore-nagios-4.4.5$ sudo a2enmod cgi
AH00558: apache2: Could not reliably determine the server's fully qualified domain name, using 127.0.1.1. Set the 'ServerName' directive globally to suppress this message
Enabling module cgi.
To activate the new configuration, you need to run:
  service apache2 restart
atsushi@NAGIVM01:/tmp/nagioscore-nagios-4.4.5$
※「make install-webconf」コマンドでApache Webインターフェースの設定ファイルをインストールしています。
※「a2enmod rewrite」コマンドで”mod_rewrite”モジュールを有効化しています。
※「a2enmod cgi」コマンドで、”cgi”モジュールを有効化しています。
ファイアーウォールの設定
atsushi@NAGIVM01:/tmp/nagioscore-nagios-4.4.5$ sudo ufw allow Apache
ルールをアップデートしました
ルールをアップデートしました(v6)
atsushi@NAGIVM01:/tmp/nagioscore-nagios-4.4.5$sudo ufw reload
※ファイアーウォールにApacheを許可して、ファイアーウォールを再起動しています。
※80番ポートのINを許可すればOKだそうです。
NagiosのAdminユーザーアカウントの作成
atsushi@NAGIVM01:/tmp/nagioscore-nagios-4.4.5$ sudo htpasswd -c /usr/local/nagios/etc/htpasswd.users nagiosadmin
New password:
Re-type new password:
Adding password for user nagiosadmin
atsushi@NAGIVM01:/tmp/nagioscore-nagios-4.4.5$※「htpasswd.users」ファイルを新規作成して「nagiosadmin」ユーザーを追加しています。次回からユーザーを追加するときは、「-c」オプションを取ります。取らないと既存のパスワードファイルが上書きされて、nagiosユーザーが消えてしまいます。
Apache Webサーバの開始
$ sudo systemctl restart apache2.serviceサービスとデーモンの開始
$ sudo systemctl start nagios.service
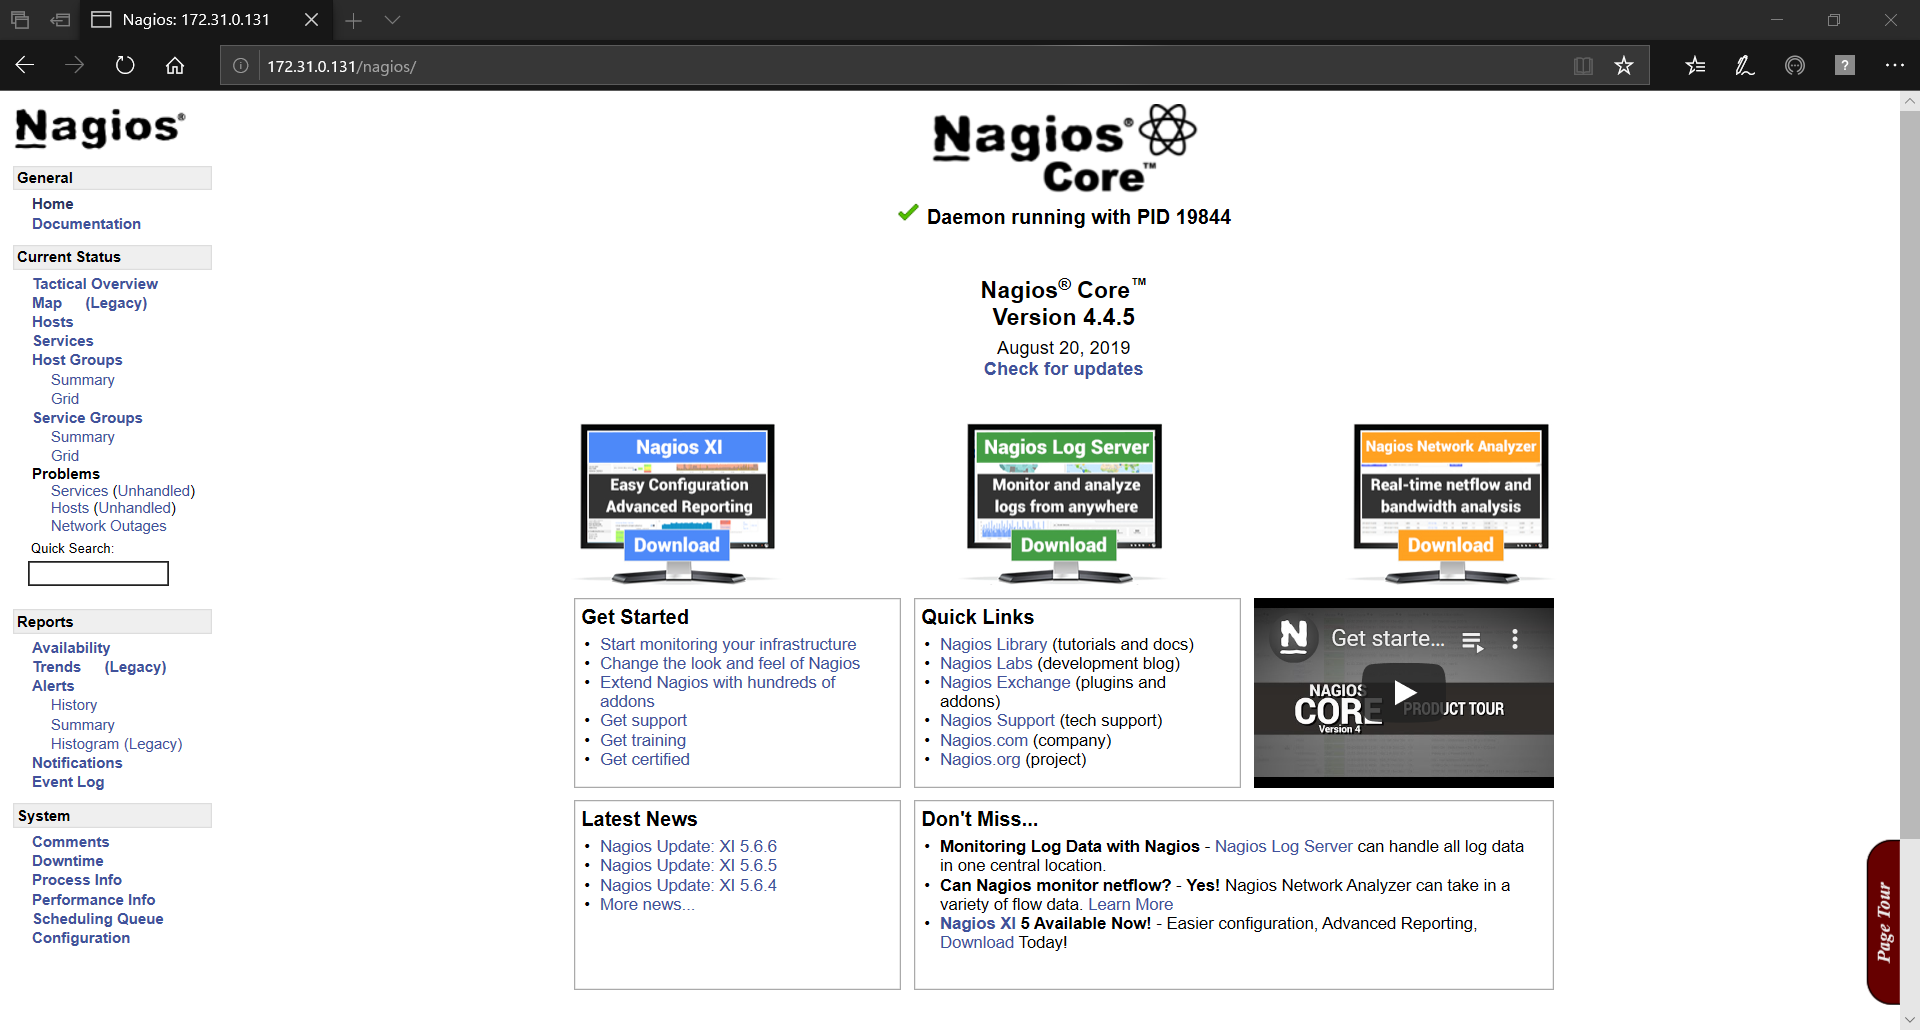
Nagios Webインターフェースにログイン
ブラウザを起動して、「http:”IPアドレス”/nagios」へアクセスします。
IDとパスワードが聞かれたら、”nagiosadmin”ユーザでログインします。


Nagios-Coreのトップ画面が表示されればインストールに成功しています。
Nagiosログのエラーの解消(Nagiosプラグインのインストール)
Nagiosの公式ドキュメントにも掲載がありますが、このままだと以下のエラーが発生すると記載があります。公式ドキュメントから引用させていただきます。
Currently you have only installed the Nagios Core engine. You’ll notice some errors under the hosts and services along the lines of:
(No output on stdout) stderr: execvp(/usr/local/nagios/libexec/check_load, …) failed. errno is 2: No such file or directory
These errors will be resolved once you install the Nagios Plugins, which is covered in the next step.
自分の環境で確認したところ、以下のようなエラーとなっていました。
atsushi@NAGIVM01:/usr/local/nagios/var$ cat nagios.log | grep stderr
[1570272911] HOST ALERT: localhost;DOWN;SOFT;1;(No output on stdout) stderr: execvp(/usr/local/nagios/libexec/check_ping, ...) failed. errno is 2: No such file or directory
[1570272946] SERVICE ALERT: localhost;Current Load;CRITICAL;HARD;1;(No output on stdout) stderr: execvp(/usr/local/nagios/libexec/check_load, ...) failed. errno is 2: No such file or directory
[1570272971] HOST ALERT: localhost;DOWN;SOFT;2;(No output on stdout) stderr: execvp(/usr/local/nagios/libexec/check_ping, ...) failed. errno is 2: No such file or directory
[1570272984] SERVICE ALERT: localhost;Current Users;CRITICAL;HARD;1;(No output on stdout) stderr: execvp(/usr/local/nagios/libexec/check_users, ...) failed. errno is 2: No such file or directory
[1570273021] SERVICE ALERT: localhost;HTTP;CRITICAL;HARD;1;(No output on stdout) stderr: execvp(/usr/local/nagios/libexec/check_http, ...) failed. errno is 2: No such file or directory
[1570273031] HOST ALERT: localhost;DOWN;SOFT;3;(No output on stdout) stderr: execvp(/usr/local/nagios/libexec/check_ping, ...) failed. errno is 2: No such file or directory
[1570273059] SERVICE ALERT: localhost;PING;CRITICAL;HARD;1;(No output on stdout) stderr: execvp(/usr/local/nagios/libexec/check_ping, ...) failed. errno is 2: No such file or directory
[1570273091] HOST ALERT: localhost;DOWN;SOFT;4;(No output on stdout) stderr: execvp(/usr/local/nagios/libexec/check_ping, ...) failed. errno is 2: No such file or directory
[1570273096] SERVICE ALERT: localhost;Root Partition;CRITICAL;HARD;1;(No output on stdout) stderr: execvp(/usr/local/nagios/libexec/check_disk, ...) failed. errno is 2: No such file or directory
[1570273134] SERVICE ALERT: localhost;SSH;CRITICAL;HARD;1;(No output on stdout) stderr: execvp(/usr/local/nagios/libexec/check_ssh, ...) failed. errno is 2: No such file or directory
[1570273151] HOST ALERT: localhost;DOWN;SOFT;5;(No output on stdout) stderr: execvp(/usr/local/nagios/libexec/check_ping, ...) failed. errno is 2: No such file or directory
[1570273171] SERVICE ALERT: localhost;Swap Usage;CRITICAL;HARD;1;(No output on stdout) stderr: execvp(/usr/local/nagios/libexec/check_swap, ...) failed. errno is 2: No such file or directory
[1570273209] SERVICE ALERT: localhost;Total Processes;CRITICAL;HARD;1;(No output on stdout) stderr: execvp(/usr/local/nagios/libexec/check_procs, ...) failed. errno is 2: No such file or directory
[1570273211] HOST ALERT: localhost;DOWN;SOFT;6;(No output on stdout) stderr: execvp(/usr/local/nagios/libexec/check_ping, ...) failed. errno is 2: No such file or directory
[1570273271] HOST ALERT: localhost;DOWN;SOFT;7;(No output on stdout) stderr: execvp(/usr/local/nagios/libexec/check_ping, ...) failed. errno is 2: No such file or directory
[1570273331] HOST ALERT: localhost;DOWN;SOFT;8;(No output on stdout) stderr: execvp(/usr/local/nagios/libexec/check_ping, ...) failed. errno is 2: No such file or directory
[1570273391] HOST ALERT: localhost;DOWN;SOFT;9;(No output on stdout) stderr: execvp(/usr/local/nagios/libexec/check_ping, ...) failed. errno is 2: No such file or directory
[1570273451] HOST ALERT: localhost;DOWN;HARD;10;(No output on stdout) stderr: execvp(/usr/local/nagios/libexec/check_ping, ...) failed. errno is 2: No such file or directory
atsushi@NAGIVM01:/usr/local/nagios/var$
このエラーを解消するために、Nagiosのプラグインのインストールを行います。
まず、以下のサイトでプラグインの最新バージョンを確認します。
https://github.com/nagios-plugins/nagios-plugins/releases
自分が2019/10/6にアクセスしたときは、「2.2.1」が最新でした。
以下のサイトで、プラグインのインストール手順を確認します。
https://support.nagios.com/kb/article.php?id=569#Ubuntu
このページの中の「Prerequisites – Common」セクションにあるパッケージのインストール確認を行います。
もし、追加で監視をしたい項目があれば、「Prerequisites – Package XYZ」セクションを参照して、必要なパッケージをインストールします。
ここでは、Commonのみを対象とします。
上記のNagiosプラグインのKBにある通り、下記コマンドを実行します。(ここではUbuntuのセクションを参照しています)
$ sudo apt-get install -y autoconf gcc libc6 libmcrypt-dev make libssl-dev wget bc gawk dc build-essential snmp libnet-snmp-perl gettextNagiosプラグインのソースのダウンロードを行います。
$ cd /tmp
$ wget --no-check-certificate -O nagios-plugins.tar.gz https://github.com/nagios-plugins/nagios-plugins/archive/release-2.2.1.tar.gz
ダウンロードしたプラグインのソースを解凍します。
$ tar zxf nagios-plugins.tar.gzコンパイル+インストールします。
$ cd /tmp/nagios-plugins-release-2.2.1/
$ sudo ./tools/setup
$ sudo ./configure
$ sudo make
$ sudo make install
下記のエラーが発生していないことを確認します。
(No output on stdout) stderr: execvp(/usr/local/nagios/libexec/check_load, …) failed. errno is 2: No such file or directory
終わりに
最後までお読みいただき、ありがとうございます。
今回はWebインターフェースログインまでの手順でしたが、Nagios-Coreにてサービスやプロセスの監視の設定を入れていきます。(アップデート日は未定です。。)
本記事が参考になれば幸いです。


コメント